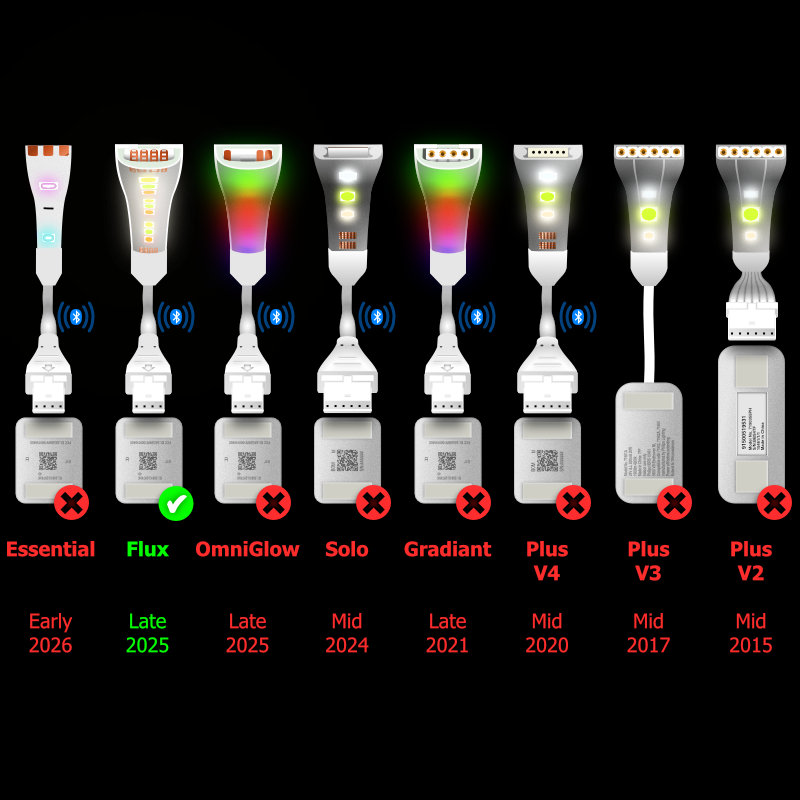
Compatibility
There are many versions of Philips Hue LightStrip now available, and lots have differing connectors. Most versions have 2 different sized connectors, the Control Box socket and the LightStrip Extension connector, making 3 different point to point cable combinations for each of the many versions. That's dozens of different cable combinations, plus splitters, all for different purposes.
Since all of our cables are made to order, please double-check the diagrams and description to be sure that this cable is compatible with your specific lightstrip, setup and needs before purchasing.
Since all of our cables are made to order, please double-check the diagrams and description to be sure that this cable is compatible with your specific lightstrip, setup and needs before purchasing.
Control Box
>
Cut LightStrip
Cut LightStrip
Cut LightStrip
Other Cables
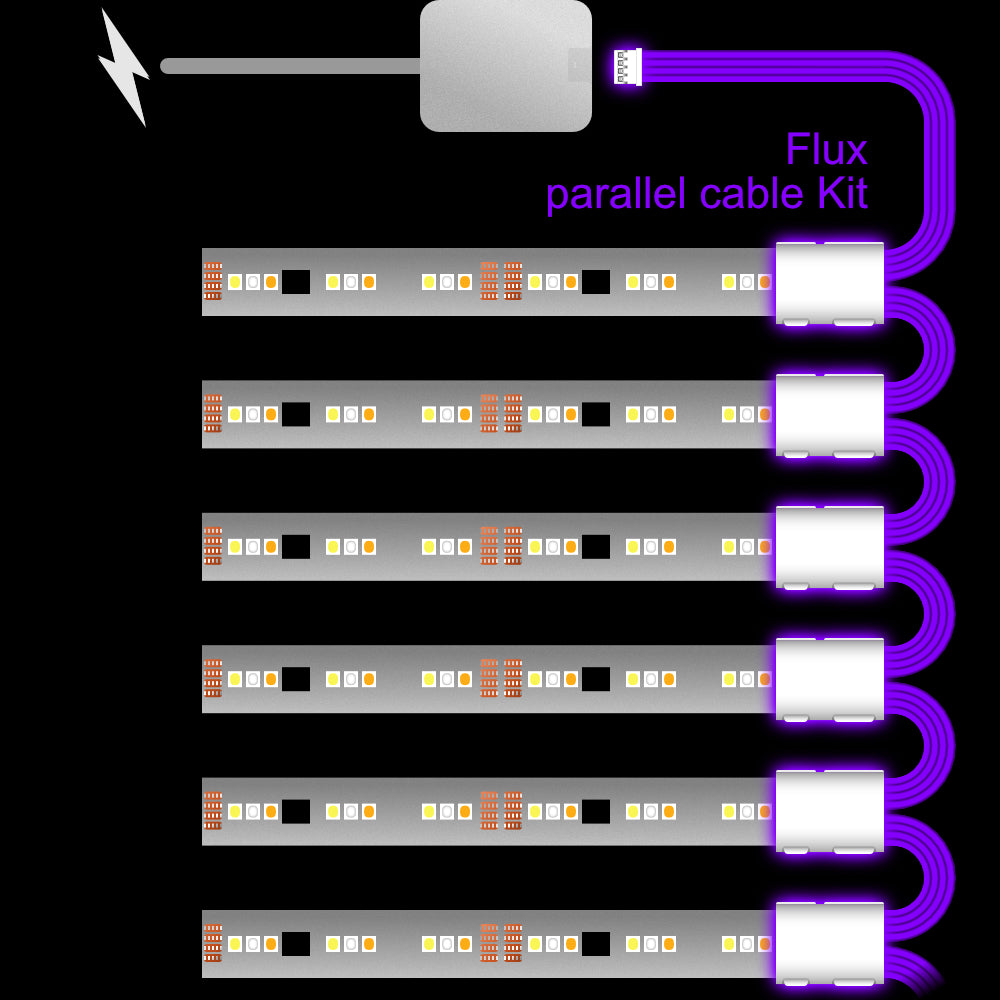
This is a custom-made Parallel Cable for Philips Hue Flux LightStrip that will allow you to run multiple Flux lightstrip sections in parallel from the same control box. With this cable, you connect cut sections of LightStrip into snap connectors that connect to one cable plugged and one control box.
You can choose how many Extension LightStrips you want to connect, the length to the first LightStrip, and finally the length between each LightStrip after that.
There are multiple scenarios for which these can be used. For example, you may want to light under many shelves.
The gradient will be set by the longer of the two lightstrips. The gradient will mirror the other LightStrip. Each Lightstrip will start at the same colour and run in parallel with one another. If a Lightstrip is shorter, it will only show the equivalent portion of the gradient.
This cable is made with the proper connectors for the Philips Hue Flux LightStrip system, giving you perfect performance and lasting reliability.
Dimensions
< Choose the Length >
These cables are custom-made to your exact length. If your preferred size isn't available, simply purchase a longer length and let us know your specifications.
Unlike other Philips LightStrips, which are controlled by power for each of the five LED colours, Flux LightStrips are controlled by data. Since power is delivered by only one core, resistance can impact performance. This explains the limited cable length compared to other LightStrips. Cables should not be combined because the maximum length available is the longest that will work without issues.
All the cables work but when they're too long for the setup they create too much resistance causing the LightStrip to randomly flash or blink. In a controlled environment the following combinations shown with a tick work well. Those with a cross will flicker. The cable length is the combined length of all the sections of parallel cable.

 There's no perfect formula for what will and won't work with each setup. This is why you can return these products for free if they don't suit your particular needs.
Unlike other Philips LightStrips, which are controlled by power for each of the five LED colours, Flux LightStrips are controlled by data. Since power is delivered by only one core, resistance can impact performance. This explains the limited cable length compared to other LightStrips. Cables should not be combined because the maximum length available is the longest that will work without issues.
All the cables work but when they're too long for the setup they create too much resistance causing the LightStrip to randomly flash or blink. In a controlled environment the following combinations shown with a tick work well. Those with a cross will flicker. The cable length is the combined length of all the sections of parallel cable.
Standard Flux LightStrip
Flat Cable
Round Cable
LightStrip Lengths
Flux Ultra Bright LightStrips
Flat Cable
Round Cable
LightStrip Lengths
Fitting Instructions
 1. Please turn off the lightstrip at the wall before plugging these cables in. This is because the Control Box calibrates to new cables and Extension LightStrips when powered on, so it knows how far to spread the gradient.
2. Where appropriate for you, cut the lightstrip directly across the cut line.
3. Make sure the snap connector is on its back, with the curved side face down.
4. Open the small clip (with the small led symbol).
5. Push the upside-down lightstrip onto the connector, being careful to make sure the pins do not go under the contacts on the lightstrip. Most of the time, this will go on without issues. Occasionally, they may need reseating.
6. Close the clip with a firm snap.
Unlike 6-pin lightstrips, 4-pin lightstrips will only work in one direction. This can easily be identified by the larger black chip. The larger black chip sits towards the back end of the cut section. The start end of the lightstrip doesn't have this chip. For this cable ensure the snap connector is seated with black chip furthest away.
7. Plug the small female end into the control box.8. When your setup is complete, plug the LightStrip back in. At this point, the LightStrip will calibrate, and you should see the connected sections light up. If a section doesn't work, the snap-on connector may need reseating. Before doing that please power off at the wall. Once it's all done, sit back and bask in the light.